The challenge with mesh networks such as MeshCore, Meshtastic, or similar systems is that a phone is still the most practical device for reading information, sending messages, and typing on a keyboard. However, the phone also needs to be connected to a node that can act as the bridge to the LoRa network. In practice, this means carrying several devices, which is not always convenient.
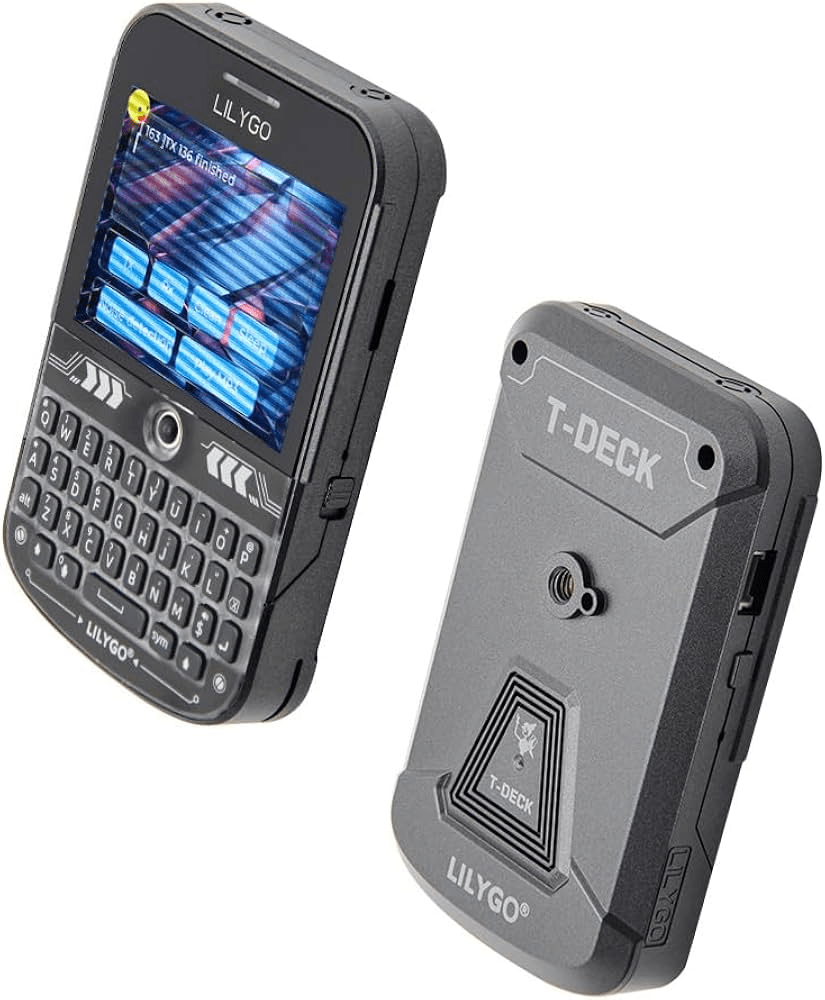
That is why I wanted to test the LILYGO T-Deck Plus. It is a LoRa device with the useful addition of a built-in screen and keyboard. This makes it possible to have a standalone device for communicating on these networks, and it should make mobile testing much easier.
I tried one, and in this post I will share the different steps I followed to get it working.
The LILYGO T-Deck Plus is a LoRa transceiver that integrates a color touchscreen. There are also versions with e-paper displays, which consume less power. Personally, I chose the color screen version simply because it was the one available quickly. It also includes a keyboard and GPS, which makes it possible to locate the device.
It has a fairly standard camera-style mount, making it easy to attach to a bike or inside a car. You can also add an SD card, which is important for storing map data. Like many maker-oriented devices, it exposes a few expansion options that could be used to connect external components, although that is not really what we are trying to do here. It also has a battery that seems to offer reasonable autonomy, but I will say more once I have run a few tests.
For this type of use, it is a rather expensive product. Usually, LoRa nodes cost around €20. Here, we are closer to €100, but the advantage is that the device can be used autonomously. Not everything is free, though, as we will see later. As a little limit to be known, the emoticons are not displayed.
There are paid firmware options, firmware with additional features that can be unlocked, and some people also bundle maps as paid packages. Depending on the options you want and the level of convenience you are looking for, you may need to budget around €15 extra to unlock useful features.
That said, these features are not required. You can still use the device fully without making these additional investments. In the end, compared with the price of the device, the extra cost remains reasonable. I also think it is worth mentioning that it can be a good thing to pay for the time invested by developers. Open source is great, and I am a strong supporter and contributor, but it also seems fair, from time to time, to contribute a little to the effort made by people who spend their nights building solutions for others.
Firmware selection
As with any device, start by going to https://meshcore.io/flasher to fetch the firmware. This is where things become slightly more complicated than usual, because there are two free firmware options available:
- The classic community firmware ( Without a GUI, it is not really useful for mobile use. )
- The Ripple firmware ( with a GUI )
In addition, there are several alternative firmwares that are quite interesting, although most of them require a paid license.
I chose the Ripple Firmware version because it includes enough functionality to send and receive messages, as well as perform several other actions. With an additional license, it can also unlock more advanced features, including map visualization under a certain zoom level, and more precise mapping capabilities (like reporting its GPS position). The free version is enough to run a node, while the paid version may be useful if you want to go a bit further.
Network Configuration
We will start by configuring a network, since the device supports several types of networks.
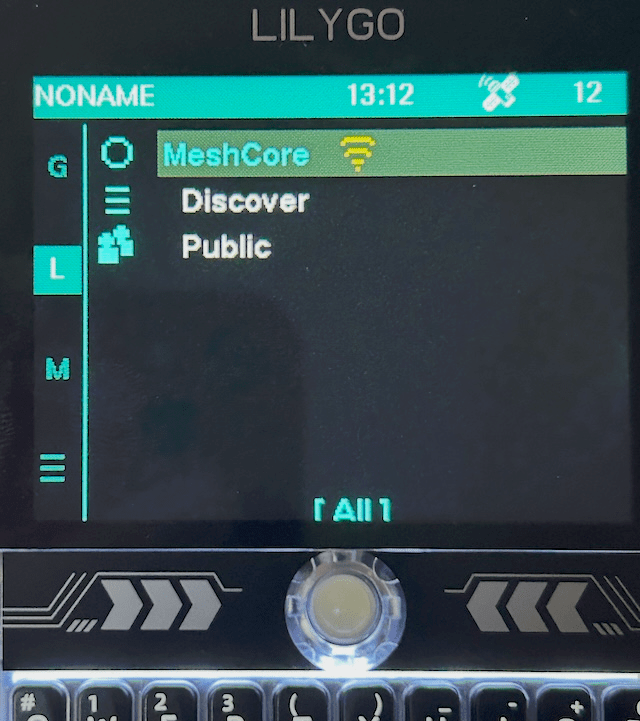
By default, after a brief introduction to the device UI, we can choose a MeshCore network. The system will suggest a name. This is not the device name, but only the network name, which is useful if several networks need to be supported. At this stage, we can keep the default name, MeshCore.
For the network configuration, we then need to open the L menu. From there, select the network we want to use. For this network, open Identity to choose the name that should be assigned to it. After that, go to Optimize to complete the additional configuration steps.
 |  |  |
Finally, the main screen (G Menu) can be configured by adding shortcuts, for example to the public channel or the nearby network. Direct links to contacts can also be added.
 |  |
For the configuration, I would rather recommend enabling the double hack. You can also add location targeting in the advert section, potentially with GPS if you have unlocked that option. And of course, this only applies if you want to share your location with the network on regular basis.
Standard and advanced features
With the standard features, you can of course handle the basics:
- connect to the public channel, type a message, and send it there. That is the real value of the system: making this easy to do while on the move, with a single tool.
- See the surrounding nodes, especially repeaters, and retrieve information about them when it is published.
- Discover nearby friends, send and receive messages, and add them to the main screen with a quick access link.
- Display the nodes & repeaters on a map once tiles, meaning map elements, have been added to the device flash. See the chapter below for more details.
- Map display up to zoom level around 10
With the advanced features, which require unlocking the product and purchasing a license, additional options become available.
To enable the advanced features, open the burger menu and click Unlock. A serial number will appear. Use this serial number to register the device by entering the code provided after the online purchase. It costs $10 (9€). The most frustrating part is that the code is not provided immediately. You have to wait for an email, which can take up to 24 hours. I’ll see how long it takes in my case.
- Map display above zoom level 10
- Group chat
- Store & forward
- Report your GPS location
Configure the map tiles
Unfortunately, there is no ready-to-use package for loading tiles onto the device. More precisely, there is one, but it requires paying a small fee to its creator. It is not very expensive and it can save you some time.
Personally, I chose to investigate how to do it myself for free. I would rather save those few euros for the license that will give me access to the advanced features.
The first step is to download the tiles, meaning the image segments that make up the map.
For this, I found several articles recommending the following GitHub project, which can download the tiles for a selected area. In the configuration below, I use it to download the whole of Europe.
Be careful: this download can take quite a long time. With the zoom levels selected in my configuration, the final result is around 475,000 tiles to download.
First, you need to create an account on Thunderforest. From this account, you will be able to find the API key you need.This is also a good opportunity to look at the different map types available and choose the one you want to use on your device. In my case, I chose the Outdoor map because it includes contour lines, which I find important when doing radio outdoors.
> git clone https://github.com/fistulareffigy/MTD-Script.git
> cd MTD-Script
> pip3 install requests tqdm
> vi TileDL.py
Edit the python file to enter your api-key and select the zone your want to cover (chat-GPT helped me well to get the coordinate)
regions = {
    "europe": (35.0, -11.0, 71.2, 15.1)
 #   ,"france_large": (41.0, -6.5, 51.8, 10.5)
}
zoom_levels = range(1, 14)
...
api_key = "your_api_key_here"
To give a sense of the level of detail available at different zoom levels, here are a few map examples at zoom levels 12, 13, 14, and 15. Here, the range is set from 1 to 14 in the script. In practice, this means that zoom levels 1 to 13 will be downloaded, since the upper bound is excluded.
 |  |  |  |
| 12 | 13 | 14 | 15 |
Once these configurations are in place, all that is left is to run the script to fetch the images. This is the part that can take a little while. By default, the images are saved on the desktop in a tiles directory. This directory contains several subdirectories, which are part of the natural organization of these images.
> python3 TileDL.py
For this geographic area, and with a zoom level going up to 15 on my machine, downloading the data takes around 10 days. You can adjust the geographic area and the zoom level depending on how much time you have. France perimeter is more like a day. To make a short test, you can setup france_large with zoom_level 1 to 12. The download is about 30 minutes for 318MB of tiles. Since each zoom level is stored in a dedicated directory, it will be possible to add additional zoom levels later. You can start from this base, download the remaining data separately, and copy it to the SD card afterward.
Once the files have been downloaded, copy them to the SD card in a directory named tiles. The ASD must be formatted in FAT32 so it can be read by the T-DECK.
Conclusion
It is still a bit early to draw any real conclusions about using the T-Deck, since I have only had it for about two days. However, so far I find it very practical to use.
It avoids having to rely on the phone all the time. At home, the Companion is usually plugged in and therefore not always within Bluetooth range. When moving around, the Companion is also a bit annoying to carry with you. In that context, the T-Deck is a genuinely practical solution, and I have been pleasantly surprised by it.
I am also positively surprised by the battery life. The device is still operational even though I have not recharged it since I got it. To be fair, I did switch it off during the night, so let’s say I have had roughly one full day of use so far. After that full day, the batteries are still above 4 volts, so there is still some margin left. I will come back to this later, but my current impression is that we can expect at least around 48 hours of battery life in a moslty stand by situation. At least, that is what it suggests so far. When it is on, it is also easy to turn off with the physical switch. That makes it the kind of device you can keep with you and use without it becoming a problem.
For comparison, I also like the T-Watch as a product. I have not tried the Ultra, but with the basic T-Watch it is quite difficult to get battery life that lasts a full day. That limits its use in daily life, especially in a radio context where you want to keep it listening. Here, the T-Deck has enough battery life to make it much more usable on a daily basis.
The keyboard also works quite well. At least for typing messages, it does the job nicely. I could imagine wanting a few more features in the built-in software, but I will see with more use whether I really miss them. Personally, I bought it mainly for sending messages.
For deployment work, it could be useful to have features such as a displayed noise level, or some quick tools to test the network. At the moment, the available functions are a bit limited, or hidden in different menus, so there is room for improvement.
There are also other T-Deck firmware options that I have not tried yet and that I mentioned earlier. They could be interesting to compare. My first impression from looking at them is that they seemed a bit visually overloaded, but they would need to be tested properly.
If you have any experience with this device, feel free to share it in the comments. It would be great to compare feedback.